Hello World!
Now that we’ve got a working installation, let’s get right into it!
At the very least, we need to create a gtk::Application instance with an application id.
For that we use the builder pattern which many gtk-rs objects support.
Note that we also import the prelude to bring the necessary traits into scope.
Filename: listings/hello_world/1/main.rs
use gtk::prelude::*;
use gtk::{Application, glib};

const APP_ID: &str = "org.gtk_rs.HelloWorld1";

fn main() -> glib::ExitCode {
    // Create a new application
    let app = Application::builder().application_id(APP_ID).build();

    // Run the application
    app.run()
}
It builds fine, but nothing but a warning in our terminal appears.
GLib-GIO-WARNING: Your application does not implement g_application_activate()
and has no handlers connected to the 'activate' signal. It should do one of these.
GTK tells us that something should be called in its activate step.
So let’s create a gtk::ApplicationWindow there.
Filename: listings/hello_world/2/main.rs
use gtk::prelude::*;
use gtk::{Application, ApplicationWindow, glib};
const APP_ID: &str = "org.gtk_rs.HelloWorld2";
fn main() -> glib::ExitCode {
// Create a new application
let app = Application::builder().application_id(APP_ID).build();
// Connect to "activate" signal of `app`
app.connect_activate(build_ui);
// Run the application
app.run()
}
fn build_ui(app: &Application) {
// Create a window and set the title
let window = ApplicationWindow::builder()
.application(app)
.title("My GTK App")
.build();
// Present window
window.present();
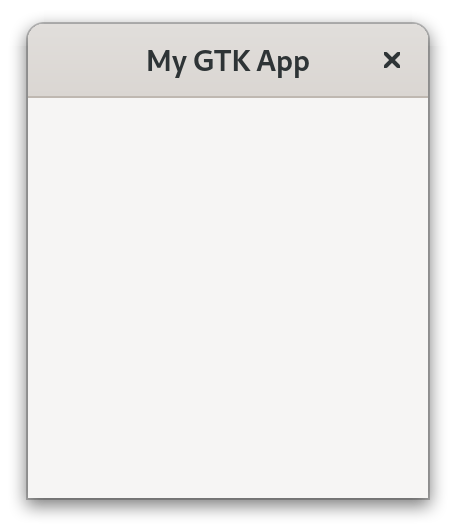
}That is better!
Normally we expect to be able to interact with the user interface. Also, the name of the chapter suggests that the phrase “Hello World!” will be involved.
Filename: listings/hello_world/3/main.rs
use gtk::prelude::*;
use gtk::{Application, ApplicationWindow, Button, glib};
const APP_ID: &str = "org.gtk_rs.HelloWorld3";

fn main() -> glib::ExitCode {
    // Create a new application
    let app = Application::builder().application_id(APP_ID).build();

    // Connect to "activate" signal of `app`
    app.connect_activate(build_ui);

    // Run the application
    app.run()
}

fn build_ui(app: &Application) {
    // Create a button with label and margins
    let button = Button::builder()
        .label("Press me!")
        .margin_top(12)
        .margin_bottom(12)
        .margin_start(12)
        .margin_end(12)
        .build();

    // Connect to "clicked" signal of `button`
    button.connect_clicked(|button| {
        // Set the label to "Hello World!" after the button has been clicked on
        button.set_label("Hello World!");
    });

    // Create a window
    let window = ApplicationWindow::builder()
        .application(app)
        .title("My GTK App")
        .child(&button)
        .build();

    // Present window
    window.present();
}
If you look closely at the code snippet you will notice that it has a small eye symbol on its top right. After you press on it you can see the full code of the listing. We will use this throughout the book to hide details which are not important to bring the message across. Pay attention to this if you want to write apps by following the book step-by-step. Here, we’ve hidden that we brought
gtk::Buttoninto scope.
There is now a button and if we click on it, its label becomes “Hello World!”.
Wasn’t that hard to create our first gtk-rs app, right?
Let’s now get a better understanding of what we did here.